Monday, April 29, 2019

Google Blogger : How to Change Theme?

There are various website themes available in the Google Blogger. You can change it anytime. The theme of your blog / website can be changed by following steps
  • Login Google Blogger with Gmail Account
  • Click on Theme
  • Customize


There are following themes in the Google Blogger.
  • Simple
  • Dynamic views
  • Picture view
  • Awesome inclusion
  • Watermark
  • Ethereal
  • Travel

Click on theme and apply any one of them.
You will see the preview of the theme just below theme
Click on apply blog


Your new theme is ready and you can see in your blog / website.

Read More »

Google Blogger : How To Add Pages in your Website?

The main menu bar of website is made by adding pages in your website. Some of the example of pages are : Home , Programming, Gadget, Jobs, MCQs, Interview Questions, Online test, Gate, Competition Exam Papers, Contact us, About us etc. 


google-blogger-pages-added

The pages are added by following steps
  • Click on New Pages
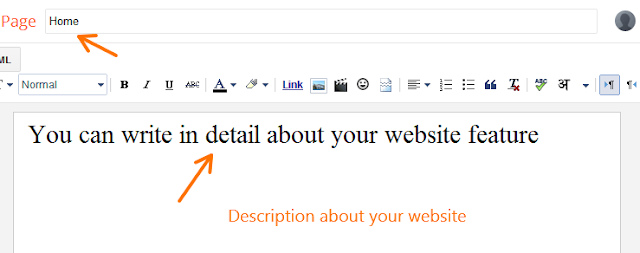
  • You can add page name just like : Home, Contact us, About us etc. ( Here two pages are added )
  • Write description about your website in home page
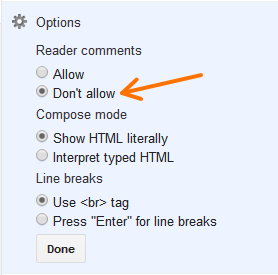
  • The option settings is done in each page. Go to option settings in the left hand side 
  • Click on Reader comment: Don’t allow
  • Publish it
  • The pages are added in your website but it is not publish still now.

pages-add-in-your-website

home-page-in-google-blogger


contact-us-page-in-google-blogger

option-setting-in-google-blogger


Publish Pages on Website

The website looks like as shown below without pages. 

website-without-menu-bar

The pages are added to website by following steps.
  • Now click on Layout
  • Go to Cross – column and add a Gadget. New screen will open – Click on Pages
  • Configure pages list
  • Add title name ( If pages is not given )
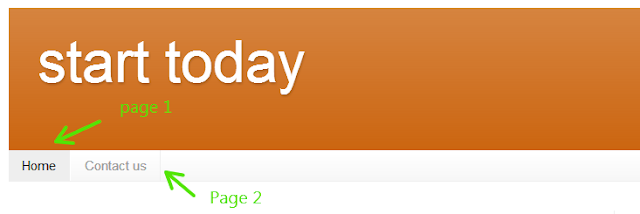
  • Click on pages : Here two pages are given ( 1 ) Home and ( 2 ) Contact us
  • Change page sequence just by drag it upward / downward if necessary
  • Save
  • Now Pages Gadget will appear in your website layout.
  • The pages will appear in your website
  • If cross column is not given in your website, you may add pages anywhere in the website by adding page gadget. 
cross-column


pages-gadget


add-pages-in-website

pages-gadget

  • Finally pages will show in your website

pages-in-your-website

You may also like :
Read More »

Friday, April 19, 2019

Google Blogger : How to Write First Post?

Things to keep in mind while writing post description
  • It is very important to write post by your own language. 
  • Do not copy and paste it. 
  • The post language should be very easy and understandable. 
  • If you keep very hard terminology in your post, users do not understand it and finally they will not visit your website. 
  • Simple if you write – Ridiculous in your post, just write the meaning of ridiculous in bracket ( stupid or unreasonable and deserving to laughing ) so everyone understand it.
  • First write your post or content in the Microsoft word and set suitable font size and color of the font. 
  • It is better to select font size 14 / 16 which is readable rather than 12.
  • Select line space at least greater than 1.15 and less than or equal to 2 in order to clearly visible. 
  • Select color of your font ( Prefer black or which is cool and dark ). 
  • Copy the post content from word file and past into post space.


Write Post

  • Click on New Post 
  • Add Post title 
  • Write content of blog post / copy from word file and paste it in the square box. 
  • Most of the post Editor tool bar features are active only when post font / statement is selected.


Some of Features of the Google Blogger post Editor tool bar

1. Post title

  • Suitable post title which is related to your post article


2. Compose

  • Default compose setting is given. 
  • You have not done anything it.

3. HTML

  • It will shows HTML page of your post description. 
  • Write your post content and click on HTML tab, it will show HTML code of your post.

4. Undo 


  •  ( Control + Z )

5. Redo 

  • ( Control + Y )
  • ( Similar to that of Microsoft word )

6. Font

  • You can set any type of font whichever you like.

7. Font size

  • Smallest
  • Small
  • Normal
  • Large
  • Largest
  • There are five options are given. It is better to select Normal size / Microsoft word file font size 14 / 16.

8. Heading

  • There are three options : Normal, Subheading , Minor Heading.
  • Your post title is normal heading. If there are headings in your post, you have to select Sub heading.

9. Bold10. Italic11. Underlined

  • Select font and click on it. It will bold font / Italic font / Underline font.

12. Strikethrough

  • It will strike line between font. Select text and click on it to check this option.

13. Text Color

  • Select text and click on text color.

14. Text Background color

  • There is no need to change text back ground color if it is white. 
  • If you want to change it, select text and click on text back ground color.

15. Link

  • It will add link in your post description.

16. Insert image

  • Add PNG or JPG image in your content description

17. Inset video

Upload video
  • Drag and drop video
  • You tube video
  • My you tube video
You can add any you tube video in your website.

18.  Insert special character

  • There are lots of special characters and symbols are given. 
  • You have to just click on it and it will appear in your blog description.


19. Insert jump break

  • Let us consider that your blog post consists of 30 lines and it is too long to see any reader. 
  • You need to insert jump break after 4 to 5 line of your post and this features show only 4 to 5 lines of your post not whole content. 
  • Keep in mind that preview will not show insert jump break features. 
  • It will show after publishing post.

20. Alignment

  • Text alignment left, center, right or justify. Select text and click on left alignment and see its effects.

21. Numbering list

  • The numbering given to topic is explained here. It works similar as that of in the Microsoft Word.


22. Bullets

  • It works similar as that of in the Microsoft Word.

23. Remove Formatting

  • Select text and click on remove formatting. 
  • It will remove all editing and format article completely.

24. Spelling check

  • It will check spelling of your article.

25. Left to right

  • Your article will type from left to right.

26. Right to left

  • Your article will type from right to left.

27. Preview

  • It will show preview of your website post.

28. Save

  • It will save your article and you can latter publish it anytime.

29. Publish

  • It will publish your article and new audience can see your article.
You may also like :
Read More »

Thursday, April 18, 2019

How to Add Your Website in the Bing Webmaster Tool?

Why to add website in the Bing Webmaster tool?

  • The Bing search engine is operated by Microsoft. 
  • If you don’t add your website in the top search engine, the search engine doesn’t show your website in the search option. 
  • Therefore it must be necessary to add website in the top search engines like google, yahoo, bing, yandex.


Add your website in the Bing Webmaster tool


  • Enter URL and sitemap of your website and it should be kept in mind that whether your site is http:// or https://. ( you should know by just open your website or any post ). Example

       URL -  https://myelectrical2015.com
  • Add


How to verify your website in the Bing Webmaster tool?

  • One of the simple way to add your website is by placing meta tag code in the <head> section of website.
  1. Open Google Blogger
  2. Go to theme
  3. Click on Edit HTML
  4. Copy this meta tag and placed below <head> tag of your website
  5. Save theme


Now verify website in the Bing Webmaster tool. ( Remember that you have to placed your meta tag in the HTML of your website then varify it )
  • You will get message – your site is verified. You can again verify by one of the following options.


Sitemap

  • Click on sitemap
  • You will see that URLs submitted is pending. 
  • It will take some time for sitemap index and after indexing completed it shows numbers of URL indexing successfully.

You may also like :
Read More »

Sunday, April 14, 2019

Google Blogger - How to Start Website / Blog Within 10 Minutes?

If you think that making website is tough work and it is out of syllabus, that is wrong. It is very easy to make new website or blog. However there are some settings which is not easy but I will explain in detail that steps. How to make simple or responsive website within 10 minutes? Lets start
  • Go to Google and type – Google blogger login


google blogger login


sign in with google blogger login

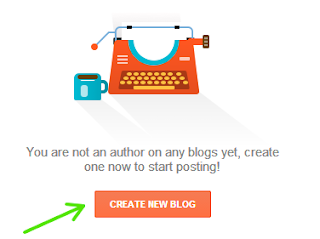
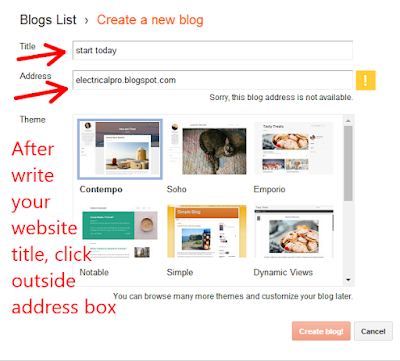
  • Sign in with your Gmail id and password – a new page will open after signing with Gmail account – create new blog – click on it – add title name of your blog / website ( Its depends upon your website content )
  • Food related – foodicated, fasting, enjoy food etc.
  • Technical or new Gadget – mobilewala, Gadgets, new technology etc
  • Education related – learn your self, start today etc
Its depend upon you and your content for website name so give name such that it is related to your article or website posts.

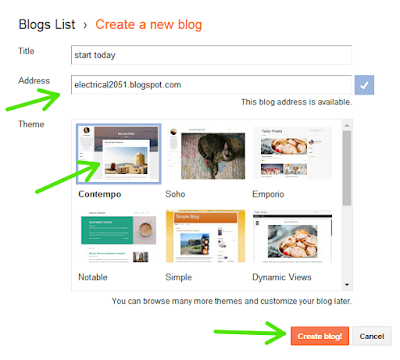
create new blog


add blog title and address name


Website address

  • Type just ‘electricalpro’ – click enter outside of address box – a message will display sorry, this blog address is not available. you can write your website name in the rectangle box. 
  • Now try another name – electrical2052 – a new message is display, this blog is available – click on create blog.


add blog title and address name

Domains

  • There are two types of Domains : ( 1 ) www.xyz.blogspot.com - Free of cost and ( 2 ) www.xyz.com - You have to pay cost for that yearly.
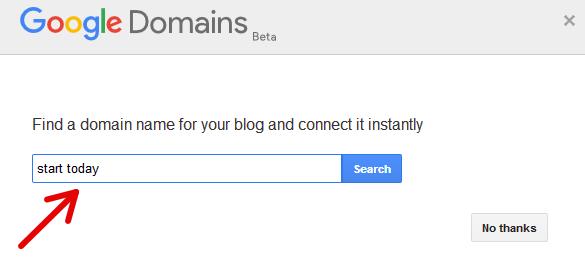
  • Every website has its domain and we called it as www.xyz.com, it you want to buy domain , then find a Google domain name for your website, it will cost around Rs. 900 per year minimum. 
  • However the cost of domain depends upon your website name.
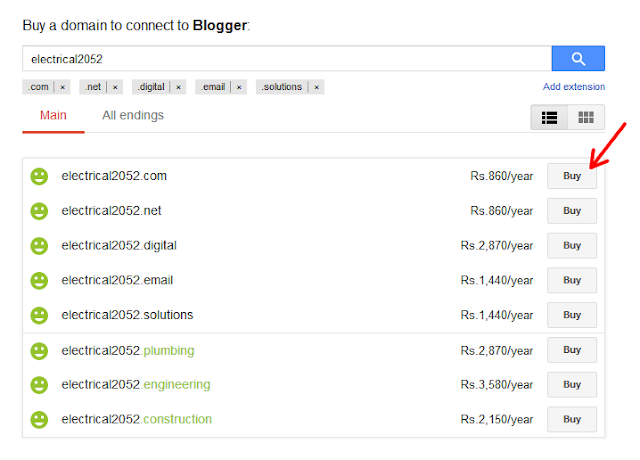
  • Write domain name ( your website name ) and check availability, if it is available then check cost and click on buy – enter your details – make payment online. 
  • Now it is your domain and your website address is just like www.electrical2052.com . you have choice that you can buy domain name later.

select domain name


pay for domain name


OR
  • You don’t want to buy domain, just click – NO THANKS. You website name is just look like – http://www.electrical2052.blogpsot.com.
  • You will check your website name by setting tab – basic – blog address.
  • Your website is ready and you can see its preview by just click on - view blog ( at left hand side first line )

website template


You can change your website theme and title name at anytime later. Summarize all steps here
  • Login to google blooger
  • Sign in with gmail account
  • Create new blog
  • Write blog name and blog address
  • Check availability - If no , change blog address name - If yes - create blog
  • Your website is ready
You may also like :
Read More »

Monday, April 1, 2019

How to Solve Site Down or Unavailable In the Google Adsense?

The website developers / Google bloggers make website in order to generate some revenue from it. The developer / blogger apply for in Google Adsense after few months’ hard work on contents of website. Finally some of them email : SITE DOWN OR UNAVAILABLE
  • It is not good news for any blogger. There are thousands of blogger receives such type of email and hardly some of them resolved that problem and gets Adsense approval.
  • Who can solve site down problem? Only those who face such type of problem and solved it. 
  • I also faced such type of problem and finally gets approval. There are following setting to be done in order to get site approval.


( 1 ) Redirect

How to redirect all posts?

  • Log in Google Blogger
  • Settings ( Left hand side )
  • Basic
  • Blog address – Click in Check box ( Redirect xyz.com to www.xyz.com )

redirect blogger to custom domain


( 2 ) HTTPS or HTTP

  • Open any one post of your blog or website and check whether it is HTTPS or HTTP. 
  • If It is HTTPS, just select Yes in the HTTPS

https settings


( 3 ) Robots.txt

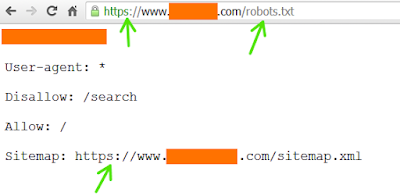
  • The robots.txt is important tools for search engine console. How to write robots.txt is explained here. 
  • Let us consider that your domain is https://www.xyz.com
  • Open any web browser and type https://www.xyz.com/robots.txt
  • New file is generated, copy this file and past in to custom robots.txt field.
  • Go to Settings – Search preferences – Custom robots.txt – Edit – Copy robots.txt file and save

settings of google blogger

robots.txt

( 4 ) Google Analytics

  • Admin
  • Create account
  • Website name : Write https://www.xyz.com
  • ( Open any post and check whether it is https or http )
  • Save it

( 5 ) Google Search console

After these five settings, apply once again in Google adsense. I think your problem is almost solved and you will get adsense approval. I will get approval within two hours after such type of settings.


adsense approval

Read More »

Featured Post

How to Save Microsoft Word File with Password?

Open Microsoft word Click on Microsoft office button Click on save as Go to Word 97 – 2003 Document ...